linux启动之进入64bit-mode并解压vmlinux.bin.gz arch/x86/boot/compressed/head_64.S
现在GRUB已经把vmlinux.bin加载到内存1M处了.setup.bin实际上我们仅用到了header.S里的内核参数部分,其它部分根本就没有读取到内存里.
我们知道vmlinux.bin是objcopy compressed/vmlinux来的:
objcopy -O binary -R .note -R .comment -S compressed/vmlinux vmlinux.bin所以1M处的代码其实就是compressed/vmlinux了.
而compressed/vmlinux是这样来的:
ld -m elf_x86_64 -T vmlinux.lds head_64.o misc.o string.o cmdline.o early_serial_console.o piggy.o -o vmlinux从而我们知道,现在执行的代码是 head_64.S
在分析head_64.S之前,我们需要强调一下:
compressed/vmlinux的关键在于piggy.o里包含了vmlinux.bin.gz,这个gz文件才是真正的linux内核代码.
第1条指令的内存地址是0,从0开始是:
.head.text(head_64.S)
.rodata..compressed(piggy.S,约4.4M)
.text, .rodata, .got, data
上边这些是物理上组成vmlinux的部分,后边还有 .bss 和 .pgtable
但由于我们是被GRUB加载进来的,GRUB是个bootloader,可不是个程序加载器,所以它只是加载物理文件,而不管你文件的组成,所以如果vmlinux的程序逻辑不处理.bss和.pgtable部分,这一部分就是块逻辑上属于vmlinux的内存,但实际上是不是完全在于vmlinux用不用它.
startup_32
我们编译的内核是x86_64的,但现在我们处在32位环境里,我们要进入64位环境.首先,需要验证cpu是否支持64位(long mode),如果是一个32位的cpu,那就没啥可说的了.
验证的逻辑写在一个函数verify_cpu里,调用这个函数就能得到结果.(这个函数没什么神秘的,cpuid指令可以获取cpu的各个参数及特性,@see AMD64-Volume2_System-Programming.pdf Page 111: Processor Feature Identification).
要调用函数,就要用到栈,现在的栈是GRUB设的,我们要用自己的.
在head_64.S的末尾,我们给自己留的有heap和stack,是时候要使用它们了.
	.bss
	.balign 4
boot_heap:
	.fill BOOT_HEAP_SIZE, 1, 0
boot_stack:
	.fill BOOT_STACK_SIZE, 1, 0
boot_stack_end:但现在vmlinux被加载到了1M处,所以需要把boot_stack_end的地址加上1M再移到%esp里,才对.
我们知道vmlinux被加载到了1M处,但是程序不知道,它需要计算出来它自己现在处在内存什么位置.
程序运行时怎么知道自己当前所处的内存地址?
如果是在x86_64下,就很容易了,可以使用 RIP-Relative Addressing 一下子就取得了当前的内存地址.
在32位下,要麻烦一点,首先call一个函数,这个函数我们紧写在call指令的后边,这样cpu会把这个函数的地址压入栈中,在这个函数里,我们把刚刚压入栈的函数地址pop出来,这样就得到了当前指令的地址.不过这里调用call需要一个栈,好的是我们只压入一个函数的地址,也就是这个栈只要有4个字节的内存就够了.
	leal	(BP_scratch+4)(%esi), %esp
	call	1f
1:	popl	%ebp
subl $1b, %ebp第65行,把1:的地址pop到了%ebp里.
第66行,从%ebp里减去从开头到1:占用的字节数,得到了vmlinux被bootloader加载到内存的位置(对于GRUB来说,是1M).
下边三行代码,把boot_stack_end加上1M,然后移到%esp里,设置好了栈.
	movl	$boot_stack_end, %eax
	addl	%ebp, %eax
movl %eax, %esp这个地址要对齐到一个配置好的内存地址上. header.S里的内核参数 kernel_alignment 的值 CONFIG_PHYSICAL_ALIGN 在 .config 文件里定义.
我们的情况是16M. 现在我们在1M, 对齐后是16M.
接下来就是准备进入64位环境了,分6步走:
| 1 | 加载新的GDT |
进入long mode之后,默认处在compatibility mode,要想进入64-bit mode,需要CS.L=1 我们现在用的GDT是GRUB设置的,CS.L=0,用这个GDT是没办法进入64-bit mode的,所以我们需要一个新的GDT 新GDT的详细分析见下边 |
| 2 | enable PAE | AMD64(x86_64架构)要求进入long mode之前必须enable PAE,这样pagetable的数据结构才是64位的 |
| 3 | Build Page table |
上边enable了PAE,这里开始准备long mode需要的4级pagetable 但实际上只build了3级,因为在第3级设了PS=1,表示page size = 2M 这3级的pagetable共map了4G内存,物理内存实际上可能没有4G(pagetable在boot_stack_end的后边,占6个4K大小) 如果在第2级设PS=1,那page size 就是 1G 的了. 详细的pagetable见下边 |
| 4 | Enable Long Mode | EFER.LME=1,这时Long Mode已经Enable了,但并没有Activated |
| 5 | Enable Paging | 启用Paging的同时,CPU会自己把EFER.LMA设为1,此时Long Mode算是Activated了,不过默认处在compatibility mode,要想进入64bit mode,需要CS.L=1 |
| 6 | lret | lret之后,CS.L=1,进入了64-bit mode (为什么要lret,不是很明白) |
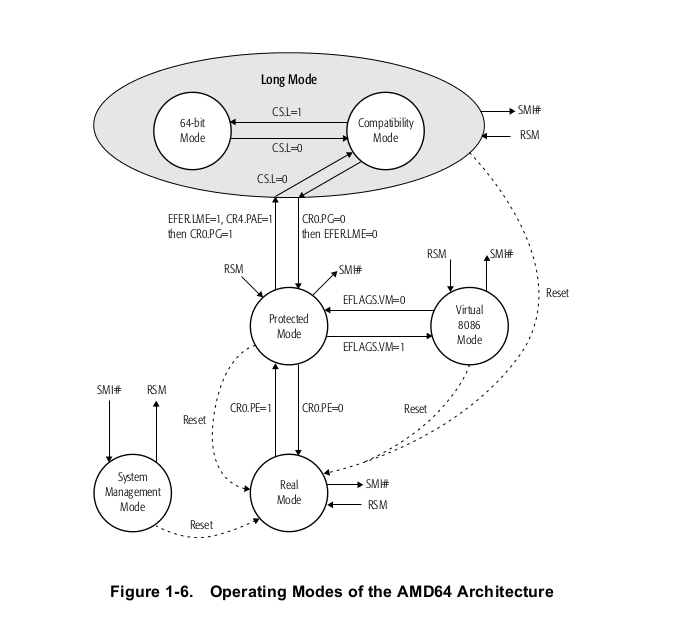
下方的引用内容均来自 AMD64-Volume2_System-Programming.pdf
Physical-Address Extensions (PAE). The AMD64 architecture requires physical-address extensions to be enabled (CR4.PAE=1) before long mode is entered. When PAE is enabled, all paging data-structures are 64 bits, allowing references into the full 52-bit physical-address space supported by the architecture.
Page-Size Extensions (PSE). Page-size extensions (CR4.PSE) are ignored in long mode. Long mode does not support the 4-Mbyte page size enabled by page-size extensions. Long mode does, however, support 4-Kbyte and 2-Mbyte page sizes.
Code-Segment Descriptors. The AMD64 architecture defines a new code-segment descriptor attribute, L (long). In compatibility mode, the processor treats code-segment descriptors as it does in legacy mode, with the exception that the processor recognizes the L attribute. If a code descriptor with L=1 is loaded in compatibility mode, the processor leaves compatibility mode and enters 64-bit mode. In legacy mode, the L attribute is reserved. The following differences exist for code-segment descriptors in 64-bit mode only:
- The CS base-address field is ignored by the processor.
- The CS limit field is ignored by the processor.
- Only the L (long), D (default size), and DPL (descriptor-privilege level) fields are used by the processor in 64-bit mode. All remaining attributes are ignored.
Control Registers
The AMD64 architecture defines several enhancements to the control registers (CRn). In long mode, all control registers are expanded to 64 bits, although the entire 64 bits can be read and written only from 64-bit mode. A new control register, the task-priority register (CR8 or TPR) is added, and can be read and written from 64-bit mode. Last, the function of the page-enable bit (CR0.PG) is expanded. When long mode is enabled, the PG bit is used to activate and deactivate long mode.
Extended Feature Register (EFER)
The EFER is expanded by the AMD64 architecture to include a long-mode-enable bit (LME), and a long-mode-active bit (LMA). These new bits can be accessed from legacy mode and long mode.
Long Mode Enable (LME) Bit. Setting this bit to 1 enables the processor to activate long mode. Long mode is not activated until software enables paging some time later. When paging is enabled after LME is set to 1, the processor sets the EFER.LMA bit to 1, indicating that long mode is not only enabled but also active.
Long Mode Active (LMA) Bit. This bit indicates that long mode is active. The processor sets LMA to 1 when both long mode and paging have been enabled by system software.
When LMA=1, the processor is running either in compatibility mode or 64-bit mode, depending on the value of the L bit in a code-segment descriptor.
这个CR0是GRUB设的,可以看到,Paging没有启用

CR0 = 0x60000011
    = 01100000 00000000 00000000 00010001

CR0.PG = 0 // Paging
CR0.CD = 1 // Cache Disable
CR0.NW = 1 // Not Writethrough
CR0.AM = 0 // Alignment Mask
CR0.NE = 0 // Numeric Error
CR0.ET = 1 // Extension Type
CR0.TS = 0
CR0.EM = 0
CR0.MP = 0
CR0.PE = 1  // Protection Enabled
gdt分析
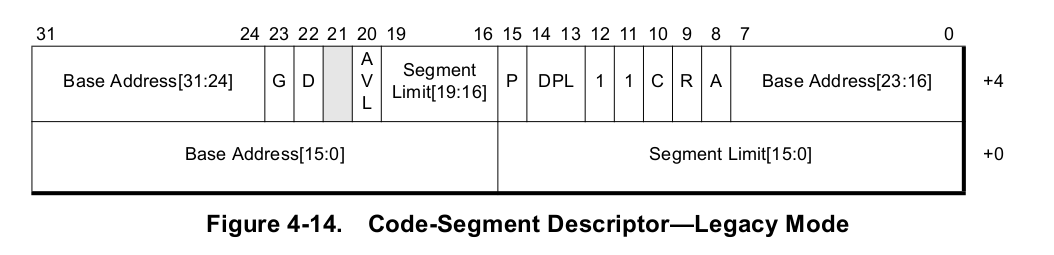
.quad   0x00af9a000000ffff  /* __KERNEL_CS */
    00000000 10101111 10011010 00000000
    00000000 00000000 11111111 11111111
| Base | 0 | |
| Limit | 0xfffff (4G) | G = 1 indicates that the limit field is scaled by 4 Kbytes |
| A | 0 | Accessed (A) Bit: The accessed bit is set to 1 by the processor when the descriptor is copied from the GDT or LDT into the CS register |
| R | 0 | Readable (R) Bit: Setting this bit to 1 indicates the code segment is both executable and readable as data |
| C | 0 | |
| DPL | 0 | |
| P | 1 | Present (P) Bit: The segment-present bit indicates that the segment referenced by the descriptor is loaded in memory |
| AVL | 0 | Available To Software (AVL) Bit: This field is available to software, which can write any value to it. The processor does not set or clear this field. |
| CS.L | 1 | This bit specifies that the processor is running in 64-bit mode (L=1) or compatibility mode (L=0). When the processor is running in legacy mode, this bit is reserved. |
| D | 0 |
Code-Segment Default-Operand Size (D) Bit: In code-segment descriptors, the D bit selects the default operand size and address sizes. In legacy mode, when D=0 the default operand size and address size is 16 bits and when D=1 the default operand size and address size is 32 bits. Instruction prefixes can be used to override the operand size or address size, or both. If the processor is running in 64-bit mode (L=1), the only valid setting of the D bit is 0. This setting produces a default operand size of 32 bits and a default address size of 64 bits. The combination L=1 and D=1 is reserved for future use. |
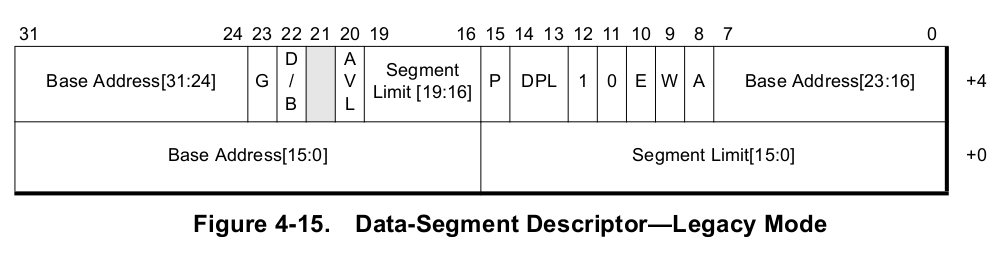

.quad   0x00cf92000000ffff  /* __KERNEL_DS */
    00000000 11001111 10010010 00000000
    00000000 00000000 11111111 11111111
| Base | 0 | |
| Limit | 0xfffff (4G) | G = 1 indicates that the limit field is scaled by 4 Kbytes |
| A | 0 | Accessed (A) Bit: The accessed bit is set to 1 by the processor when the descriptor is copied from the GDT or LDT into one of the data-segment registers or the stack-segment register. |
| W | 1 | Writable (W) Bit: Setting this bit to 1 identifies the data segment as read/write. When this bit is cleared to 0, the segment is read-only. A general-protection exception (#GP) occurs if software attempts to write into a data segment when W=0. |
| E | 0 | Expand-Down (E) Bit: Setting this bit to 1 identifies the data segment as expand-down. In expand-down segments, the segment limit defines the lower segment boundary while the base is the upper boundary. Clearing the E bit to 0 identifies the data segment as expand-up. |
| DPL | 0 | |
| P | 1 | |
| AVL | 0 | |
| D/B | 1 | Data-Segment Default Operand Size (D/B) Bit: For expand-down data segments (E=1), setting D=1 sets the upper bound of the segment at 0_FFFF_FFFFh. Clearing D=0 sets the upper bound of the segment at 0_FFFFh. In the case where a data segment is referenced by the stack selector (SS), the D bit is referred to as the B bit. For stack segments, the B bit sets the default stack size. Setting B=1 establishes a 32-bit stack referenced by the 32-bit ESP register. Clearing B=0 establishes a 16-bit stack referenced by the 16-bit SP register. |
pagetable分析
这里解释下leal 0x1007(%edi),%eax,为什么是0x1007呢?0x1000(%edi)指向下一个pagetable的地址,0x7的二进制是111b,分别表示user access, writable, present.
同理, 0x183的二进制是1 1000 0011,分别表示: Global Page, Page Size 2M, writable, present
startup_64
进入64位环境后,重新做了一遍在32位环境里做的事(因为kernel可能是被64位bootloader加载进来的),包括重置段寄存器(ds,es,ss在64bit-mode下不起作用),计算被bootloader加载到内存的位置(1M),vmlinux.bin.gz解压缩后的内存地址(16M),z_extract_offset(16M+offset=0x1000000+0xd68000=0x1d68000=29.40625M), %rsp(16M+offset+boot_stack_end)等.然后将自身从1M处复制到16M+offset.
这里需要解释一下的是,复制不是从1M开始往后复制的,而是从bss往前复制的.
我们知道,GRUB将vmlinux.bin + padded zero + crc32加载到了内存,而这里复制时从bss往前复制,bss只是逻辑上的,并不占实际的文件大小,所以复制的时候相当于丢掉了padded zero + crc32部分.
复制完成后,jmp到了relocated继续执行.
relocated开头先清空了.bss,bss包括了堆和栈及其它未初始化的全局变量.这就设置好了程序执行环境.下边就开始解压缩vmlinux.bin.gz了.
这里解释一下解压的逻辑,我们打算把vmlinux.bin.gz解压到16M内存处,现在vmlinux.bin.gz处在16M+offset+input_data=0x1000000+0xd68000+0x269=0x1d68269=29.40684M的位置(input_data可以通过
readelf -s vmlinux | grep input_data取得),可是我们知道未压缩的vmlinux.bin大约是17.6866M,解压完成之后,会覆盖掉当前正在运行的代码.不过看下当前relocated的位置(怎么看?bochs运行时汇编指令左侧的就是内存地址),现在是0x21c16a0=33.7555M,16+17.6866=33.6866,覆盖掉的部分是startup_32和piggy.S,但是vmlinux.bin.gz在piggy.S里呀,这就是要有一个offset的用处,这个offset可以保证覆盖掉的部分都是已经解压缩过的.mkpiggy的任务就是要计算好这个offset的值,保证不会因为解压缩出来的内容增长过快,覆盖掉尚未解压的部分.
解压缩就是调用了下边的函数:
decompress_kernel(
    void *rmode,                // %rdi
    memptr heap,                // %rsi
    unsigned char *input_data,  // %rdx
    unsigned long input_len,    // %rcx
    unsigned char *output       // %r8
)我们在.config里定义了 CONFIG_KERNEL_GZIP=y, 所以misc.c里include了decompress_inflate.c,在这个文件里 #define decompress gunzip.
解压完成后,验证解压出来的vmlinux是个有效的ELF文件,读取program headers
readelf -l compressed/vmlinux.bin,将LOAD段加载到内存.vmlinux.bin共有5个load段,当前的位置和加载后的位置分别为:
16M+0x200000    = 18M       => 0x1000000 (16M)
16M+0xc00000    = 28M       => 0x1a00000 (26M)
16M+0xe00000    = 30M       => 0x1acd000 (26.801M)
16M+0x1000000   = 32M       => 0x1ace000 (26.805M)
16M+0x10e3000   = 32.9M     => 0x1ae3000 (26.9M)
解压完成之后,直接跳到16M处执行了.
到此,我们算是走完了bootstrap部分,进入正式的kernel(vmlinux).